WELCOME TO RAEIMA'S PASSION
My daughter is always busy with some activities like painting, drawing, and origami, etc. But once completed, she does not clean it up, and it irked me a lot. I am fed up with cleaning and aligning😡. So I came up with a new idea to making Craft Organizer using milk cans.
Usually, I buy two milk cans per week, Once it is emptied, I tried making this organizer for my daughter. I am thrilled with the output and Now I would like to share the step-by-step procedure with you guys.
I am using those empty cans for many purposes such as
- Storing grocery items in the storage container.
- Sponge holder in the kitchen sink
- Craft organizer for storing my kid's craft items.
- Soapbox
- Pot to grow small plants in the balcony.
- Watering jug for plants.
For more craft ideas, please click the Crafts button on my home page, click the Sitemap button on my home page for all info about my blog.
Please look below video link with Tamil Language and caption in English Language:
MATERIALS NEEDED:
- Four same-size milk can
- scissor
- punching machine
- wire
- needle
- thread
- glue gun
- yogurt container small
- Four same-size milk can
- scissor
- punching machine
- wire
- needle
- thread
- glue gun
- yogurt container small
INSTRUCTIONS:
- Choose four same size milk cans otherwise it does not look good.
- Measure 4 inches from the bottom of the can and cut into two halves similarly do the same for other cans.
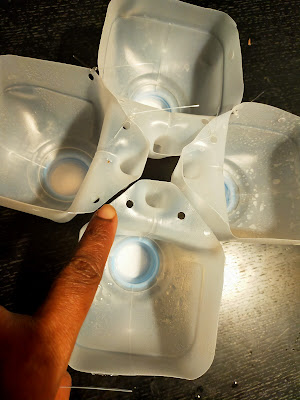
- Now join the top part of the cans together like a 'plus sign' with the help of a glue gun or else tie with the twine using a needle (Here I punched the can using a punching machine then I tied with wire).
- Arrange each bottom part of the can in between the two top parts of cans.
- Tie the bottom part and top part of cans using thread and needle or stick the cans using a glue gun.
- Now you can stick the yogurt container into the center part of the organizer using a glue gun.
- Decorate the organizer in your way.
PICTORIAL:
Choose four same size milk cans otherwise it does not look good.
Measure 4 inches from the bottom of the can and cut into two halves similarly do the same for other cans.
Now join the top part of cans together like a 'plus sign'.
Fix it with the help of a glue gun or else tie with the twine using a needle (Here I punched the can using a punching machine then I tied with wire).
Arrange each bottom part of the can in between the two top parts of cans.
Tie the bottom part and top part of cans using thread and needle or stick the cans using a glue gun.

Apply glue at the bottom of a yogurt container.
Now you can stick the yogurt container into the center part of the organizer using a glue gun.


Comments
Post a Comment