WELCOME TO RAEIMA'S PASSION

Rasa Vada is an authentic dish in the "Kanyakumari" or "Nanjil Nadu". It is an excellent combination with idly, dosai, rice and even it is a good snack with tea or coffee. The speciality of this dish is we use a dal vada in the rasam recipe.The taste will increases double when the vada soaks in the rasam up to four hours.Another recipe made by using this dal vada is "Vada Aviyal", Hmm!! both recipes are tasty and suits with rice.
In my childhood days, there was a small hotel near my home. There will get an appam, idly, dosai, poori, rasam vadai, paruppu vada, urad vada, etc. I usually go there to buy rasa vada. Hmm!!, the taste was outstanding. Even I am a friend with the owner grandpa 😊, so usually will go inside the kitchen itself. In that room have many wood-burning stoves, and he cooked sambar, idly, poori, etc in each stove.
Using this vada, we can make "Vada Aviyal", "Sambar Vada", and For more Info, Please go through below links,
Points to be noted before making rasa vada recipe:
- Add a less spice than usual rasam recipe.
- Add a small lemon size of tamarind for this recipe(add the tamarind size is less than normal rasam recipe).
- Don't add tomato in this recipe.
- Add curry leaves gives good aroma and flavor, but I don't have the curry leaves so i used Coriander leaves.
- Don't soak the Channa dal with water over two hours because if it soak over two hours the dal will change into soft and soggy texture.
- Grind the mixture in coarse form so after frying the vada becomes so crunchy or else it becomes soft.
- In usual rasam recipe we not boil it very well but in rasa vada recipe we have to boil the rasam very well. So the vada will absorb the rasam easily.
After making the rasam it is watery and blunt to taste, but the taste of rasam will be doubled when soaking dal vada for three to seven hours. The flavour of the dal vada is dominating the rasam and makes a more tasty and it's different from the usual rasam.
Ingredients to making a Rasa vada Recipe:
- Channa Dal - 2 cup
- Coriander seeds - 1 tsp
- Pepper seeds - 1.5 tsp
- Cumin seeds - 1 tsp
- Garlic - 3 nos
- Coriander leaves - handful
- Turmeric Powder - 1/2 tsp
- Whole Chilli - 3 nos
- Tamarind - small lemon size
- Oil - 2 tsp
- Oil - for frying
- Mustard seeds - 1/2 tsp
- Curry leaves - 1 spring
- Onion small size - 1 no
- Green chillies - 2 nos
- Ginger - 1 inch
- Salt - required taste
Please look at the Rasa Vada recipe in the below video (audio in Tamil and caption in English language)
Methods for making a Rasa vada recipe:
Step 1: For making Dal Vada:
Soak 2 cup of Channa dal with water, it absorbs the water and becomes doubled. After 2 hours, drain the dal without water. Grind the dal in the mixie with an opposite mode for two or three times. The grinding mixture should be in a coarse form. Add one onion, green chillies, Curry leaves or coriander leaves, Ginger and required salt in the mixture. Mix it nicely and make a small ball, just press the ball, it's comes in flat shape or using a spoon to make a scoop then just press the scoop, it comes in flat shape. Both methods are working well, but I basically prefer second method because all vadas comes in the same size and same shape. Add required oil for frying the vada in the pan, Once oil is hot, gently add a vadai one by one. Deep-fry until its change to brown color. Hmm! The dal vada is ready!.
Step 2: For making Rasam:
Grind the masalas (1 tsp coriander seeds, 1 tsp cumin seeds, 1.5 tsp pepper, 1/2 tsp turmeric powder, 3 whole chilli, 2 whole garlic) in the coarse form. In a pan, add 2 tsp oil. Once it's hot, add mustard seeds, 1 chopped garlic, curry leaves. After mustard splutter and garlic changed into brown color, add ground masalas in the pan. Then add a small lemon size tamirand paste, 4 cups of water, required salt and 1 tsp asafoetida powder. Once Boiled well, add fried vada in the pan. Soak the vada over three to seven hours in the rasam. Serve with coriander leaves.
Step to step images for making a Rasam Vada:

Take 2 cup of Channa dal in the bowl, soak the dal with water in two hours. Don't soak over two hours because the dal become more soft and soggy texture.

Drain the dal completely without water.we are going to grind the dal without water.

Grind the dal in the mixie as opposite mode. So the dal texture is in coarse form and more crunchy when we deep fry it in oil.

Add finely chopped 1 small size onion or 6 small onions, 1 inch finely chopped ginger, finely chopped 1 spring curry leaves or coriander leaves, 3 finely chopped green chilies, and required salt in the mixture.
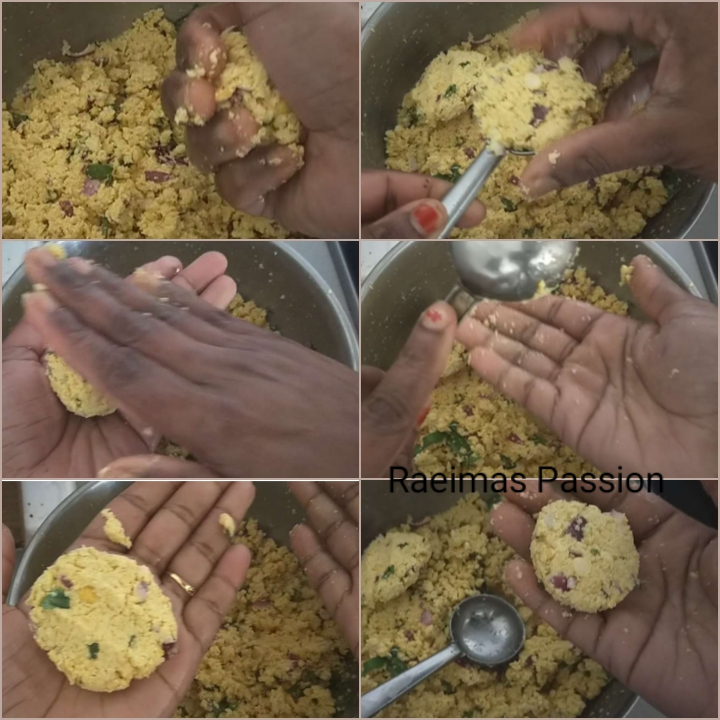
There are two methods to make a mixture ball for making rasa vada. the first method is to make a ball as per required size, just press that ball by another hand (look at the above left side photos for your reference) and another method is first chosen a required size spoon then press the vadai mixture evenly in that spoon and just tap that mixture in another hand. The mixture will come as a spoon shape then press it nicely (look at the above right side photos for your reference).

For both methods, the same shape will come but I will prefer the second method because using that required spoon we can make a same size for all vadas.

Add a required oil in the pan for deep frying vadas.

Once oil hot, add the vada one by one in the pan and wait for sometimes otherwise the vada will break. Once it's changed into a light brown color, then flap into the other side.

Take the vada in the pan once it's changed into brown color and crispy. Hmm!! Now the crispy dal vada is ready!!!.

Grind the masalas (1 tsp coriander seeds, 1.5 tsp pepper seeds, 1 tsp cumin seeds, 3 whole red chillies, 2 garlic and 1/2 tsp turmeric powder) with small amount of water in coarse texture.

In a pan, add 2 tsp oil and once it hot, add mustard seeds, 2 chopped garlic, curry leaves.

Once the mustard seeds splutter, add the grind mixture in the pan.

Add a small lemon size tamarind paste and 4 cups of water in the pan.

Add a required salt in the pan.

Add a 1/2 tsp asafoetida powder in the pan.

Boil the rasam very well, In usual rasam recipe we not boil it very well but in rasa vada recipe we have to boil the rasam very well. So the vada will absorb the rasam easily.

Once it boiled well, switch off the flame. Add the fried vada in the rasam and soak it over three to seven hours.

Super recipe
ReplyDeleteI like it very much 😊😊
ReplyDelete